Showing posts with label design team. Show all posts

Wednesday, October 10, 2012

Halloween Graveyard Haunting

I hope everyone is having a fabulous fall!  For this month's project, I wanted to celebrate Halloween - in particular Halloween Graveyard Haunting!  There's certainly a trend toward decorating for Halloween as we generally do for Christmas.  Globecraft Memories ornaments are perfect for the celebration!  

When I first approached this project, I had ideas...but really wasn't sure how to execute them.  And here's my confession...I was having so much fun creating - I FORGOT to take pictures along the way!  However, steps are outlined below...and what's more important - I summon you to give this a haunted try!

Supplies Used
Instructions
  • Cover the middle layer of the Little Fancy Oval Bubble Frame with Green Cardstock.  Distress edges with black ink.  (Use the rest of the bubble frame for another project!)
  • Emboss the Orange Cardstock with Sizzix Embossing Plate (Flower Rings).  Distress flowers with black ink.
  • Emboss the center layer (design) of the Halloween Graveyard Haunting Ornament with Black Embossing Powder.  For a matte look, Copic markers work well!  Actually, just about any media works great - try your favorite!
  • The ornament frame comes with two bubbles.  Paint the back bubble with Black Acrylic Paint.  You will need to paint several layers - allowing to dry between layers.  Acrylic paint dries quickly, though, so this project can be finished rather quickly.
  • Once the back bubble is solidly coated with Black Acrylic Paint, add one more layer.  While this layer is still wet, sparingly cover with Silver Glitter for that full-moonlight effect.  Allow to dry - shake off any excess glitter before assembling bubble frame.
  • Assemble Bubble Frame - Orange Layer on top of Black Embossed Design Layer on top of Green Layer.
  • Add Ribbon Bow to the Ornament Hole.
BTW, here's your chance to get 25% off your entire next order from Globecraft Memories/Piccolo Decor!  Enter Coupon Code TS25 on your next order for your discount - This discount is only good through Halloween, so be sure to stock up now!

Wednesday, October 3, 2012

The Harvest Moon

The Hubs has been taking some outdoor photos with our new camera and I just new the Pumpkin Bubble Frame Kit was the perfect piece to display one of them!


Rather than use the pumpkin straight from the package I redid it in Vintage Double Dot papers by BoBunny. To make sure my papers fit correctly I laid the pumpkin layers FACE down on the BACK of the patterned papers and traced them. Then I cut them out, flipped them over, and distressed them with walnut stain distress ink.


Unfortunately after this month the Hobby Baby DT will be disbanded, but I've been so lucky to be offered a position with Globecraft to continually design for them each fourth week of the month! Be sure to keep an eye out on the website for my works and some videos :) 

Monday, September 10, 2012

Bubble Frame Easel Box


Today's project is a gift for my friend, Pat Bolda.  I loved this pic of her daughter in this fun hat - so thought it would make a great gift.  Remember as you explore this project, you can save 25% off your entire Globecraft Memories  purchase - enter Discount Code TS25 when you checkout!

The project is a one-drawer easel box.


 Supplies for box:
   Chipboard - two pieces - 5-1/2" x 6-1/2"
   Cardstock for drawer assembly:
      Frame - 11-3/4" x 9-1/2"
      Pull Drawer - 8-1/2" x 9-1/2" (Actually I used these measurements - then trimmed off 1/8" to make the drawer slide in/out easily)
      Bottom/Top Covers - two pieces - 5-1/2" x 6-1/2"
      Box Side/Back - two pieces - 1-3/4" x 5"; one piece - 1-3/4" x 6"
      Drawer Sides - two pieces - 1-3/4" x 5"; two pieces - 1-3/4" x 6"
      Drawer Pull - one piece - 4-1/4" x 3/4"; one piece 4" x 1/2"
      Two brads

Box Assembly:
   Cut chipboard for top and bottom.  Cover with cardstock.

Chipboard - 5-1/2" x 6-1/2"
Covered Chipboard - Cardstock used unknown source
   Cut cardstock for drawer frame as shown below...red lines are score lines.

Assemble as shown in following pictures.
TIPS:
   The color you want to be see should be INSIDE (Bo Bunny SUN Kissed Skies shown here - the clouds will be covered.)
   Glue the middle tabs BETWEEN the top and bottom layers.
Frame - 11-3/4" x 9-1/2"
  
Cover sides and back with cardstock.  Note:  Even if you already like the outside cardstock pattern, cover sides and back to give box strength.

Drawer Assembly:

   Cut cardstock for drawer frame as shown below...red lines are score lines.

Assemble as shown in following picture.
TIPS:
   The color you want to be see should be INSIDE ( (Bo Bunny SUN Kissed Skies shown here - the clouds will be covered.)
   Glue tabs OUTSIDE the box.  They will be covered.
Assemble Drawer Pull.  Cut two strips of cardstock using dimensions above.  Attach to front cardstock panel with brads BEFORE adhering to drawer...this provides strength to open drawer without tearing cardstock.  Glue sides, back, and front to assembled drawer.

 
Glue top and bottom to drawer frame.


Supplies for Easel:
   Cardstock - 10" x 6"
   Cardstock - 5" x 6"
   Cardstock - 3" x 5"
   Cardstock - 1/2" x 5"

Score and fold large piece of cardstock in half to be 5" x 6".  Score and fold the top half at 2-1/2".  Glue bottom half to top of box assembly.  Glue 5" x 6" cardstock ON BOTTOM HALF ONLY so it will fold up as an easel as show below. 

Glue 1/2" strip at top of 3" x 5" cardstock.  Glue to inside bottom  of easel - glue front edge flat; use pop-dots at back edge to serve as a stop for the easel when open.


Supplies for Globeframe Embellishment
   Middle layer of Little Fancy Oval Bubble Frame.
   Strip of cardstock - accordion folded at 1/4"
   Red Ink Pad 
   Flowers/Leaf
   Feathers
   Ribbon
   Liquid Pearls - Cantaloupe used
   Butterfly Punch - Martha Stewart 3-in-1 Classic Butterfly
   Any rubber stamp - Flourish Squares used

Rectangle Frame:  Emboss with  Piccolo Butterscotch Enamel Powder.  Distress by rubbing red ink pad over embossed frame.

My intent was to emboss the oval frame in red.  As I didn't have any red embossing powder, I decided to ink the frame in red and emboss with a clear powder.  However, after just inking the frame in red, I loved the rugged wood-like appearance and decided to leave well enough alone!

I also embossed flourishes from Piccolo Decor Set #3 and Piccolo Decor Set #10 in Piccolo Butterscotch Enamel Powder and distressed by rubbing in red ink pad.
For the accordion embellishment on the lower left of the frame, I accordion folded a piece of yellow cardstock, distressed it with red ink, then randomly stamped a flourish design with red ink.

My final assembly in detailed pics:


Supplies for Inside Sentiment
   Sentiment - Children WordArt from http://lazydaisydesigns.blogspot.com used.
   Distress Inks - Crimson Red and Toffee used
   Piccolo Butterscotch Enamel Powder
   Feathers

Decorate inside of easel card as desired.  I printed the WordArt to fit and distressed the senitment with Red and Toffee inks.  The Piccolo pieces are embossed with Piccolo Butterscotch Enamel Powder and distressed with red ink to match bottom layer of frame.  Feathers - and good to go!


You can order Bubble Frames, Piccolo Decor, and Enamel Powder - not to mention all kinds of fun items - from Globecraft Memories - Use Discount Code TS25 to get 25% Off your entire order!  

Friday, September 7, 2012

One more CHA Halloween Project

I get to share one more project that went to CHA for the Winter show in Chicago:


This is the Pumpkins Ornament available for $3.99. I embossed the pieces with Siam Silver ($6.49) and then inked them with alcohol inks. For the vines on the pumpkins I used the Medium Flourishes charm set ($3.99), embossed with the Mossy Glen enamel ($6.49). Before I adhered everything together I added a bit of moss to the inside of my piece. It's backed with just plain white cardstock so I could make sure and glue all my moss down securely.. nothing worse than moss (or other bits!) floating around inside a plastic globe! On the outside of my globe I twirled some brown wire and adhered a vintage button to the top. Sort of a "third" pumpkin on the outside :) 

Tuesday, August 28, 2012

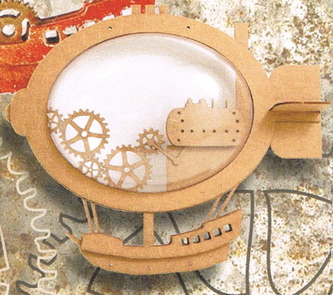
Steampunk Airship

This month I had a great time creating the 

To make this I used the Steampunk Airship Kit, Piccolo Accents: from Floral Whimsy the swirls were used on the top and Vintage Gears Embellishments Set for the additional gears inside, the the turn key in the front. Piccolo Enamel Powders and Piccolo Enamel Powder Adhesive and Glastique Gloss Finishing Gaze to glue the airship together.

Below is a picture of the kit... you may notice I have a lot more gears in my finished airship.


Pictured here is what is include in the kit!

All pieces were covered with Piccolo Enamel Powders and Piccolo Enamel Powder Adhesive.  Colors used were: Vintage Gold, Vintage Silver, Copper Kettle, Mermaid Tears and Glided Rose Gold. 

Before adding the bubble these pictures were taken.  
Here you can see the dimension of the gears.

To lift the gears I took the centers of some of the gears  in the Vintage Gears Embellishments Set and glued two to three together to lift a gear up.  Making sure the placement would not be hindered when the bubble frame was added. 

Here is a look at the other side... 
If you notice the exhaust on the back, the are left over pieces from some swirls I punched out for another project. I keep all the pieces... You never know when you may be able to use them on a project!!!

If you love Steampunk... 
this is a must have kit for you.

Visit GLOBECRAFT MEMORIES HERE!!!

Purchase any of the products shown here and more 
25% off your entire order... 
Use code TS25 for the discount when you check out!

Wednesday, August 15, 2012

Faux Metal Embossing

Hi, this is Candy and for my turn posting for Hobby Baby this month I am sharing a new technique (well, new to me at least) that I call faux metal embossing.

For this project, I used the Little Fancy Oval globe from Globecraft Memories. I did not use the top frame because I wanted more of the metal embossing to show through.

Here's how I did it:

First, I placed the frame in a Sizzix/Tim Holtz Texture Fades embossing folder and ran it through my Big Shot so it created the raised impressions.

Then, I inked the entire thing with Rusty Hinge Distress Ink using an ink applicator tool.

To add some depth, I went back in with Walnut Stain Distress Ink and with a dabber, added some additional color here and there.

Next it is time to add the "metal" ... I covered a brayer with Piccolo Enamel  Powder Adhesive and then ran the brayer over the frame, highlighting just the raised edges. Then, I sprinkled Copper Kettle Enamel Powder over the top. I used a dry paintbrush to brush off any enamel powder that stuck where it wasn't supposed to and then melted the powder with a heat gun.

After repeating that last step twice, this is the finished product. Doesn't it look like embossed metal?!


To finish off my project, I covered that back frame with Copper Kettle Enamel Powder and painted the easel black. I used brads to cover the alignment holes. The ribbon is from Maya Road, dyed to match the outfit my aunt is wearing in the photo. The flower is from Making Memories. I printed our names and the date of the photo on the computer, trimmed and inked them to match. Our names were attached with Black Foam Adhesive Squares to provide a bit more depth and definition.

By the way, the photo is of me and my dad's youngest sister. It was recently given to my mom by an aunt. Until then, we didn't know the photo existed, so it is a bit special.

Thanks for reading and I hope you try this new technique soon!
To encourage you, Globecraft Memories is offering a 25% discount on these and all of their products. Visit PiccoloDecor.com and use coupon code TS25 in the checkout.

Tuesday, August 7, 2012

A little vintage Halloween @ CHA

Hello Globecraft fans!! DeeDee here today.. and I have the distinct pleasure of sharing one of my favorite globes.. it was even at Summer CHA in Chicago on display for Globecraft Memories and Hobby Baby in their booth!!!


To alter the frame I distressed the edges with Vintage photo distress stain, and stamped the frame surface with a Viva Las VegaStamps! stamp. I backed the ornament with plain white cardstock, topped the it with a gorgeous silk vintage ribbon and blinged it up a little with some half pearls. 


This photo helps show off the dimension of these super fun ornaments.
there are tons of other ornaments, both Halloween and Christmas.. find them all at Piccolodecor.com and don't forget to use coupon code TS25 for 25% off your order!

Saturday, July 28, 2012

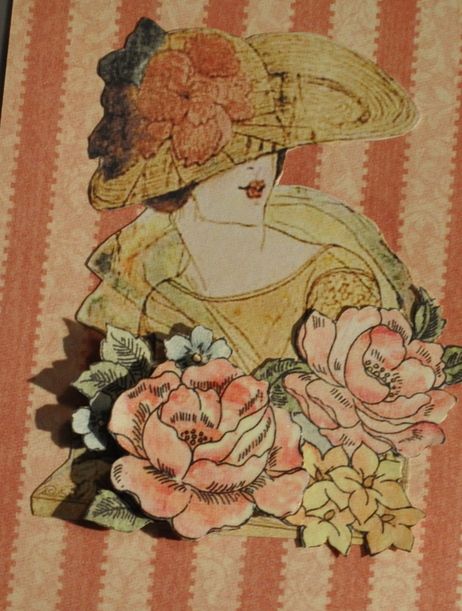
Lady of the Past

I am loving my LADIES DIARY pattern paper from Graphic 45.  Using one of the Hobby Baby 3D Greeting Card Rectangle Bubble Frames. I was able to showcase one of the beautiful ladies and some to the delicate flowers. Fussy cut lady and flowers to use in the arrangement.
The 3D Greeting Card Rectangle Bubble Frames is just the right size for wallet sized pictures.  Perfect for giving those school pictures to grandparents.  The finished frame is approximately 4 1/4" x 51/4" x 1/2".
To adhere the beads to the frame I used the amazing Glastique Gloss Finishing Glaze as a glue.  It is a flexible finishing glaze that goes on as a clear coating, used as a clear coat glaze it remains flexible and dries crystal clear.
From the Piccolo Decor Card Set 5 paint the Cat  & Bird  with acrylic craft paint, then seal with the Glastique Gloss Finishing Glaze. Coat the Piccolo Bird Cage with Piccolo Embossing Enamel Vintage Gold; adhered the Piccolo Enamel Powder Adhesive.  Adhere the Piccolo Decor pieces to the frame with Glastique Gloss Finishing Glaze.

Supplies:
3D Greeting Card Rectangle Bubble Frames
Glastique Gloss Finishing Glaze
Piccolo Embossing Enamel Vintage Gold
Piccolo Enamel Powder Adhesive
Piccolo Decor Card Set 5 (Cat & Bird with Bird Cage)
Graphic 45 Ladies Diary pattern paper
To buy your Hobby Baby Products click HERE!!!  When you order be sure to use the 25% off coupon code TS25!