Showing posts with label steampunk. Show all posts

Tuesday, August 28, 2012

Steampunk Airship

This month I had a great time creating the 

To make this I used the Steampunk Airship Kit, Piccolo Accents: from Floral Whimsy the swirls were used on the top and Vintage Gears Embellishments Set for the additional gears inside, the the turn key in the front. Piccolo Enamel Powders and Piccolo Enamel Powder Adhesive and Glastique Gloss Finishing Gaze to glue the airship together.

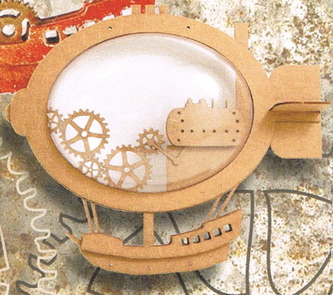
Below is a picture of the kit... you may notice I have a lot more gears in my finished airship.


Pictured here is what is include in the kit!

All pieces were covered with Piccolo Enamel Powders and Piccolo Enamel Powder Adhesive.  Colors used were: Vintage Gold, Vintage Silver, Copper Kettle, Mermaid Tears and Glided Rose Gold. 

Before adding the bubble these pictures were taken.  
Here you can see the dimension of the gears.

To lift the gears I took the centers of some of the gears  in the Vintage Gears Embellishments Set and glued two to three together to lift a gear up.  Making sure the placement would not be hindered when the bubble frame was added. 

Here is a look at the other side... 
If you notice the exhaust on the back, the are left over pieces from some swirls I punched out for another project. I keep all the pieces... You never know when you may be able to use them on a project!!!

If you love Steampunk... 
this is a must have kit for you.

Visit GLOBECRAFT MEMORIES HERE!!!

Purchase any of the products shown here and more 
25% off your entire order... 
Use code TS25 for the discount when you check out!

Monday, June 11, 2012

Zentangled Airship

This may be a pretty kitschy project, but I'm loving it after having completed it.  Steampunk Airships have been catching my eye for months now.  Zentangle, as well, always makes me stop in my tracks.  Yet I have no real love for either.  Hmmmm....For some odd reason, I found combining the two to be intriquing. 

Beginning with the Mini Steampunk Airship from Globecraft Memories, I Zentangled the frame, some hot-air balloons in the globe, and part of the tail.  I debated whether to use traditional steampunk coloring - however, my Zentangle preference is pure black and white - or at the very least bright colors...so I added a touch of red for color.  I do feel you can nover go wrong with red, black, and gold!  Accented with Piccolo enamel powders - Textured Black, Gilded Rose Gold, and Butterscotch, I am liking my finished airship!
Click here for free step-by-step instructions for this project.
You can purchase the Steampunk Airship Kit and enamel powders at 25% Off - Visit Globecraft Memories and use  Discount Code TS25 for 25% Off your entire purchase!

Monday, May 21, 2012

Living In A Bubble: Steampunk Style


Hello friends!  Jan here with my first post as a member of Hobby Baby Design Team.  I'm so excited to be part of this team and have an opportunity to work with these amazing products!  The Globes are so much fun to work with and they can be used in altered art projects as well as framed projects. The NEW chipboard gears were the perfect size for the head trinket.  I heat embossed the gears with Micro Copper Powder.   Globecraft Memories is generously offering 25% off your entire purchase!  Use coupon code TS25.
I started with a cardboard birdhouse.
Use the Oval Frame as a template and cut an oval in the front of the house.
Paint the house, base and the head with black acrylic paint.
Paint the spigot knob and roof with copper acrylic paint.  Let dry.
Heat emboss random areas of the knob using copper powder.
Heat emboss the chipboard gears.
Ink chipboard frame and stamp script.
Using Crop-a-dile, punch holes in the center and insert a battery operated tea light.
Glue the tea light in place.  
Glue metal gears and chipboard gears to head trinket.  Glue over the tea light.  Glue the Globe over the head trinket.
Using Glastique, adhere a beaded chain around the outer edge of the globe.
Add corsage pins, charms and chain to the base.
Insert the spigot knob in the base of the house.
Using glue for metal, adhere clock parts and gadgets to the house.
Make Steampunk words for the roof.
Glue into place on the roof
I painted coffee stir stick with black and copper acrylic paint.  I added silver rings to the stirs and glues them to the house.  Black on the roof and copper on the house.

Glue sticks to the roof and house using a Quick Dry Adhesive.
Hope you have enjoyed my "Living In A Bubble: Steampunk Style" Project.  If you have any questions, please feel free to contact me.