Monday, May 28, 2012

Bubble Frames That Tell a Story

When I saw the Story Tellers Fancy Rectangle Globe Frame I thought of my favorite story the Wizard of OZ and all the wonderful paper Graphic 45 has made. 


First I cut my images from Graphic 45 papers and used Crystal Lacquer on them.
I covered the Base and two middle frames with Graphic 45 papers. The top most frame I covered with Piccolo Vintage Silver Enamel Poweder using the Piccolo Enamel Powder adhesive.
The flower and leaf vine Piccolo Card Decor were also covered with Piccolo Enamel Powders. 
In these pictures you see everything assembled before the bubble is added.  Images were adhered with glue dots and foam tape to give dimension. 

Here you can see the Piccolo Enamel Powders on the outermost frame. It was also used to edge the second frame, Vintage Silver layered with Mossy Green.

 A close up of the Piccolo Card Decor flowers. 
Before adding the bubble i-roc gems were adhered to the center of the flowers.   
Finally the bubble is added.


Globecraft Memories has been generous enough to provide us with a coupon for 25% off your total order. When you place your order use the code TS25 for the coupon!!! 

Thursday, May 24, 2012

Love These Bubble Frames

Today is my first as a Hobby Baby design team member. This was probably the hardest post I have ever done. The products from Globecraft Memories are so much fun to work with, I just couldn't decide what to make for my post. I did a lot of playing, and you will see some of the other projects in the next few days. Today I am going to share one little goody with you. I apologize in advance for my photos. I haven't been able to replace my good camera. It is hard to get pictures without reflections with my daughter's camera. Anyway, on to the good stuff...
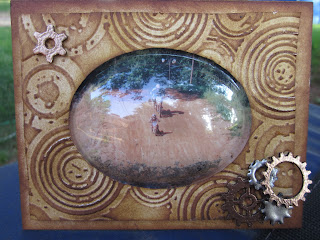
 This is one of the Globecraft Memories Bubble frames. This size is sized for wallet sized photos. I used a 4x6 photo that I cut down. This bubble frame is a cardstock frame, so I took the both layers inked them with Tim Holtz Brushed Corduroy Distress Ink Then I ran it through the Vagabond in a Sizzix embossing folder. I took another blending tool and brushed Vintage Photo Distress Ink across the raised surfaces.
 Look at these great sprockets and gears in the corner. These are some of the new Micro Picolo pieces that will be available soon.The Piccolo enamel adhesive makes embossing these a snap. The enamel adhesive comes in a bottle with a dauber top. You just press it to the chipboard, sprinkle the enamel powder, and then heat set. I used Copper Kettle and Vintage Silver. I love that although they are both metallic, they are very different looking. The silver is a much thicker enamel, but the copper is much finer. I used Glastique as an adhesive to hold the gears and sprockets.
 Here is the bottom of the really fun part...if you are a motocross racers, dirt is everything. If you are a little boy racing motocross, you dream of going to Loretta Lynn's ranch. Not because they want to hear her sing, but because there is a huge race there each year. My son qualified for Loretta's, but we decided not to go. We did stop and let him walk the track and check out the grounds on one of our trips through Tennessee. He was so excited, that he filled a plastic bag with dirt and brought it home. He even gave some of the dirt to friends that also loved motocross. As I was playing with this frame, I thought about that dirt. I took some of the Glastique and glued some of Loretta Lynn's dirt in the globe. The glastique dries clear, so it looks like the dirt is just sitting there. It looks like the roost that gets thrown when they are taking off.
 You can see the embossing here and the sprocket. In person it almost looks like carved wood.
Take a good look at these pieces here. See how much thicker the silver is than the copper? You have got top try these enamel powders. They are amazing. Also, did you notice the clean edges on the chipboard pieces? This is a compressed chipboard that is laser cut, so they are gorgeous.You can look though the currently available Piccolo pieces here.

I know once you look at these you are going to want to play with them yourself. Globecraft Memories has been generous enough to provide us with a coupon for 25% off your total order. The coupon code is TS25.

Happy Crafting!
KathyJo

Monday, May 21, 2012

Living In A Bubble: Steampunk Style


Hello friends!  Jan here with my first post as a member of Hobby Baby Design Team.  I'm so excited to be part of this team and have an opportunity to work with these amazing products!  The Globes are so much fun to work with and they can be used in altered art projects as well as framed projects. The NEW chipboard gears were the perfect size for the head trinket.  I heat embossed the gears with Micro Copper Powder.   Globecraft Memories is generously offering 25% off your entire purchase!  Use coupon code TS25.
I started with a cardboard birdhouse.
Use the Oval Frame as a template and cut an oval in the front of the house.
Paint the house, base and the head with black acrylic paint.
Paint the spigot knob and roof with copper acrylic paint.  Let dry.
Heat emboss random areas of the knob using copper powder.
Heat emboss the chipboard gears.
Ink chipboard frame and stamp script.
Using Crop-a-dile, punch holes in the center and insert a battery operated tea light.
Glue the tea light in place.  
Glue metal gears and chipboard gears to head trinket.  Glue over the tea light.  Glue the Globe over the head trinket.
Using Glastique, adhere a beaded chain around the outer edge of the globe.
Add corsage pins, charms and chain to the base.
Insert the spigot knob in the base of the house.
Using glue for metal, adhere clock parts and gadgets to the house.
Make Steampunk words for the roof.
Glue into place on the roof
I painted coffee stir stick with black and copper acrylic paint.  I added silver rings to the stirs and glues them to the house.  Black on the roof and copper on the house.

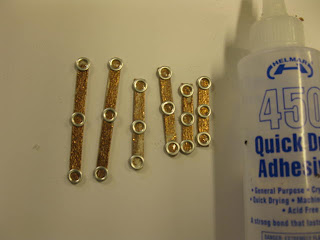
Glue sticks to the roof and house using a Quick Dry Adhesive.
Hope you have enjoyed my "Living In A Bubble: Steampunk Style" Project.  If you have any questions, please feel free to contact me.


Sunday, May 20, 2012

More Where That Came From

Experienced papercrafters enjoy the challenge of using a variety of favorite products in one project.  I loved creating this project because it allowed me to design, create, and test my imagination on how to use favorite products in new ways.  Here is my finished product embellished with my new favorites - Piccolo Decor sets and Vintage Copper Enamel Powder.  Embellish your everyday projects with these at 25% off.  Visit Globecraft Memories and enter the Discount Code TS25 for 25% off your purchase!)
 
 
This project may look much more complicated than it really is.  The hardest part?  Deciding what type of trinkets to include in the shadow boxes...but by the time I was finished, I was almost wishing I had more boxes!  For step-by-step instructions, click here.
Here are close-ups of all the great embellishments...or visit the gallery for a slideshow.


I might add, one thing I know I will do differently next time around....include a Globeframe from Globecraft Memories on top of the center drawer.  But that was an afterthought - with no energy to tear the door apart to add the frame...maybe later....I believe it could fairly easily be placed right on top.  But you may want to think ahead and include that from the beginning...I think a small bubble frame will add even more to an already fun project.